
When I was a kid, I remember playing on the original Nintendo and thought it was the greatest thing that was ever invented. Over the years gaming has changed quite a bit as technology advances, but the experience has nonetheless stayed the same; you sit in front of a TV screen with a controller to manipulate whatever is shown in front of you. Nintendo has tried to change it up with the Wii, same with the Xbox Kinect and the Sony PlayStation Move, but honestly, they all seemed like a gimmick to me and did nothing to improve the gameplay. Nothing still beats a good old gamepad, and I thought it’d stay that way for quite some time.
Enter Into the Rift
I wasn’t “wowed” with virtual reality (VR) when I first read about it; it came off as expensive, and all the games I saw seemed more like unfinished tech demos. But I thought the technology itself was interesting and had potential. I had high hopes that it’d be a lot more polished in the end, considering it was being funded by ID Software.
But Facebook acquired Oculus and I didn’t think VR would survive. Then a couple of years later, walking into a Best Buy on a random day, my wife and I decided to purchase one. All because I left her alone at the Oculus kiosk. The demo of “The Climb” with the touch controllers convinced her that the next wave of gaming and entertainment is right around the corner, and I wasn’t going to say no to that.
The Price of Admission
When we purchased the Oculus it was around $800 at the time. The price has since dropped to $399 which is impressive considering its competitor, the HTC Vive, still sells for around $799. The barrier of entry for VR is getting much easier, but keep in mind that a VR capable PC is still needed to run it. My setup was well below the minimum requirements, but it still ran most applications quite well (with the exception of Lone Echo). The accessories are also inexpensive, so if I did break a sensor or controller accidentally I can easily replace it.
The Setup
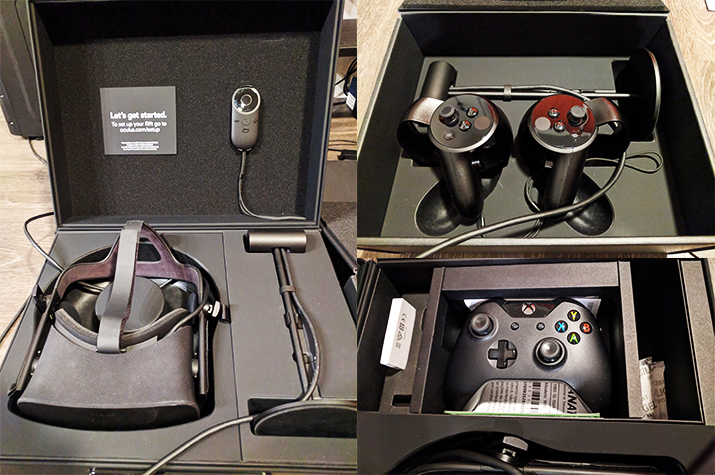
So what came in the boxes?
- 1x HMD Unit
- 2x Tracking Sensors with stands
- 2x Touch Controllers
- 1x USB 3.0 to USB 2.0 Cable
- 1x Rockband VR Adapter
- 1x Xbox One Controller
- 1x Oculus Remote
Setting up the sensors took a while because I wanted to mount them perfectly on the wall and figure out how to run the wires in an unobtrusive location. Since I wanted to do room-scale tracking, I also had to purchase a third sensor (and cable extensions), which means my PC needs at least three USB 3.0 ports. That’s not including the USB port (as well as an unused HDMI port) needed to power head unit itself. So the main takeaway? Make sure you have the necessary ports to run the Oculus.
Positioning the trackers was a bit tricky also, since room scale tracking was still experimental. Thankfully there was a guide online that was easy to follow. Once everything was set up I installed the Oculus software from the website and followed the setup guide.

The step-by-step guide was straightforward and easy to follow, which included diagrams and well-written instructions. Being able to navigate between steps is a big plus, so if I happen to find out I did one the steps wrong I can just easily go back. For safety, they also added a feature called the “Guardian” where I can set my safe area based on my living room layout, as well as detecting whether I had the optimal space for movement. The system detects it from the “tracing” I created using the touch controllers, so if I happen to cross the boundary, a virtual wall would pop up alerting me that I’m in proximity of a wall or furniture. This can be easily redrawn if I found the space to be limiting. The developers also added an option of disabling it, but I highly recommend keeping this enabled.
Now for the slightly awkward: to calibrate the tracking I had to place the HMD on top of my head, use the touch controllers, and navigate with the mouse at the same time. I didn’t want to drop the head unit, so I was gingerly moving trying to click on the next step. I’m sure there’s probably a much more efficient way to do this, so I’ll have to experiment.
Putting on the head unit was relatively easy; to secure it, there are two Velcro straps on each side, as well as one on the top. I had to adjust the headset up and down until the picture came into focus. After that, it’s just a matter of tightening the straps, with the sides first then top so it doesn’t slide down. There’s also a lens slider located under the headset that allowed me to adjust how far apart the lenses are from each other. For those who must wear glasses, it can be done, but I found it too uncomfortable. If it’s needed, there are always third-party accessories that make it a lot more manageable.
As for the controllers, these are hands down the best controllers designed for VR. I demoed the HTC Vive at the Microsoft store for comparison, and it didn’t come close to how comfortable the Oculus Touch controllers were. Each one was extremely light and ran on one AA battery that lasted for weeks. The controls felt natural, with each button/joystick strategically placed for easy access. Whoever designed these should be proud of themselves.
*Quick note: I recommend on putting the controllers on first, then the headset.
With all the initial setup out of the way, it’s time to get into the important stuff, right? Correct, but it’ll be on the second part of my blog, which I will go over content, gameplay, and overall impression.
If you have any questions on the Rift or just want to talk about your own experience with VR, just leave a comment here or email me at ronnel@redonkmarketing.com
